Bash
-
Rename all files by number in a directory
$ ls | cat -n | while read n f; do mv "$f" `printf "%02d.png" $n`; done -
Show Key Name
showkey - examine the codes sent by the keyboard
$ showkey -aPress any keys - Ctrl-D will terminate this program a 97 0141 0x61 -
Grep
Find content into directory files.
grep "some string" . -R
Another method for the same result.
grep -rnw . -e 'some string'-
Make File Executable
chmod u+x script.sh
Bootable usb (linux)
Voici le processus pour générer une clé usb d'installation d'un système Gnu/Linux.
Avant tout, il faut se procurer un .iso du système à installer et une clé USB avec un espace de stokage supérieur à cet .iso.
-
Trouver le périphérique de la clé USB
$ sudo fdisk -l... Disque /dev/sdb : 7,2 GiB, 7763656704 octets, 15163392 secteurs Modèle de disque : USB DISK 2.0 Unités : secteur de 1 × 512 = 512 octets Taille de secteur (logique / physique) : 512 octets / 512 octets taille d'E/S (minimale / optimale) : 512 octets / 512 octets Type d'étiquette de disque : dos Identifiant de disque : 0x39d2fa1e ...Dans la réponse vous devez récupérer un chemin qui doit ressembler à quelque chose comme ça
/dev/sdxdans cet exemple nous avons/dev/sdb. -
Générer la clé USB à partir de l'Iso
$ dd if=image.iso of=/dev/sdb bs=4M && syncSi cette opération ne fonctionne pas essayez de reformater la clé.
encfs & fusermount
* Intall -> fuse-utils encfs
* encfs - mounts or creates an encrypted virtual filesystem
* fusermount - mount and unmount FUSE filesystems -
Create new folders.
´encfs /home/$USER/coffre/ /home/$USER/coffre_open/´ -
Unmount and encrypt folder.
´fusermount -u /home/$USER/coffre_open´ -
Mount and decrypt folder.
'encfs /home/$USER/coffre/ /home/$USER/coffre_open/'
ffmpeg
-
Concatenate
ffmpeg -i input1.mp4 -c copy -bsf:v h264_mp4toannexb -f mpegts intermediate1.ts ffmpeg -i input2.mp4 -c copy -bsf:v h264_mp4toannexb -f mpegts intermediate2.ts ffmpeg -i "concat:intermediate1.ts|intermediate2.ts" -c copy -bsf:a aac_adtstoasc output.mp4 -
Extract Images at Framerate
ffmpeg -i video.mp4 -vf fps=framerate output_images%02d.jpg -
Mov to mp4
ffmpeg -i movie.mov -vcodec copy -acodec copy out.mp4 -
1.5 scaling
ffmpeg -i output.mp4 -vf "scale=iw/1.5:ih/1.5" output3.mp4 -
Cutting
ffmpeg -ss 00:00:00.0 -i boctok.mp4 -c copy -t 00:01:18.0 cut2.mp4 -
Get first frame -- same size
ffmpeg -i bocto-site.mp4 -vf "select=eq(n\,0)" -q:v 3 bisous.jpg -
Get frame at time
ffmpeg -ss 00:23:45 -i input -vframes 1 -q:v 2 output.jpgffmpeg -ss 0.5 -i inputfile.mp4 -t 1 -s 480x300 -f image2 imagefile.jpg -
Convert images to video
ffmpeg -framerate 1 -pattern_type glob -i '*.jpg' -c:v libx264 -r 3 out.mp4
fish
The friendly interactive shell. website
-
Define Fish to default shell
- Shows the full path of
fishwithwhichorwhereis:$ which fish > /usr/bin/fish - Now, change your login shell:
chsh -s /usr/bin/fish
- Shows the full path of
-
Alias
Add alias (exemple):
$ alias x="exit"Save alias:
$ funcsave x
Git
-
Git Log
Decoration
git log --graph --abbrev-commit --decorate --format=format:'%C(bold blue)%h%C(reset) - %C(bold cyan)%aD%C(reset) %C(bold green)(%ar)%C(reset)%C(bold yellow)%d%C(reset)%n'' %C(white)%s%C(reset) %C(dim white)- %an%C(reset)' --all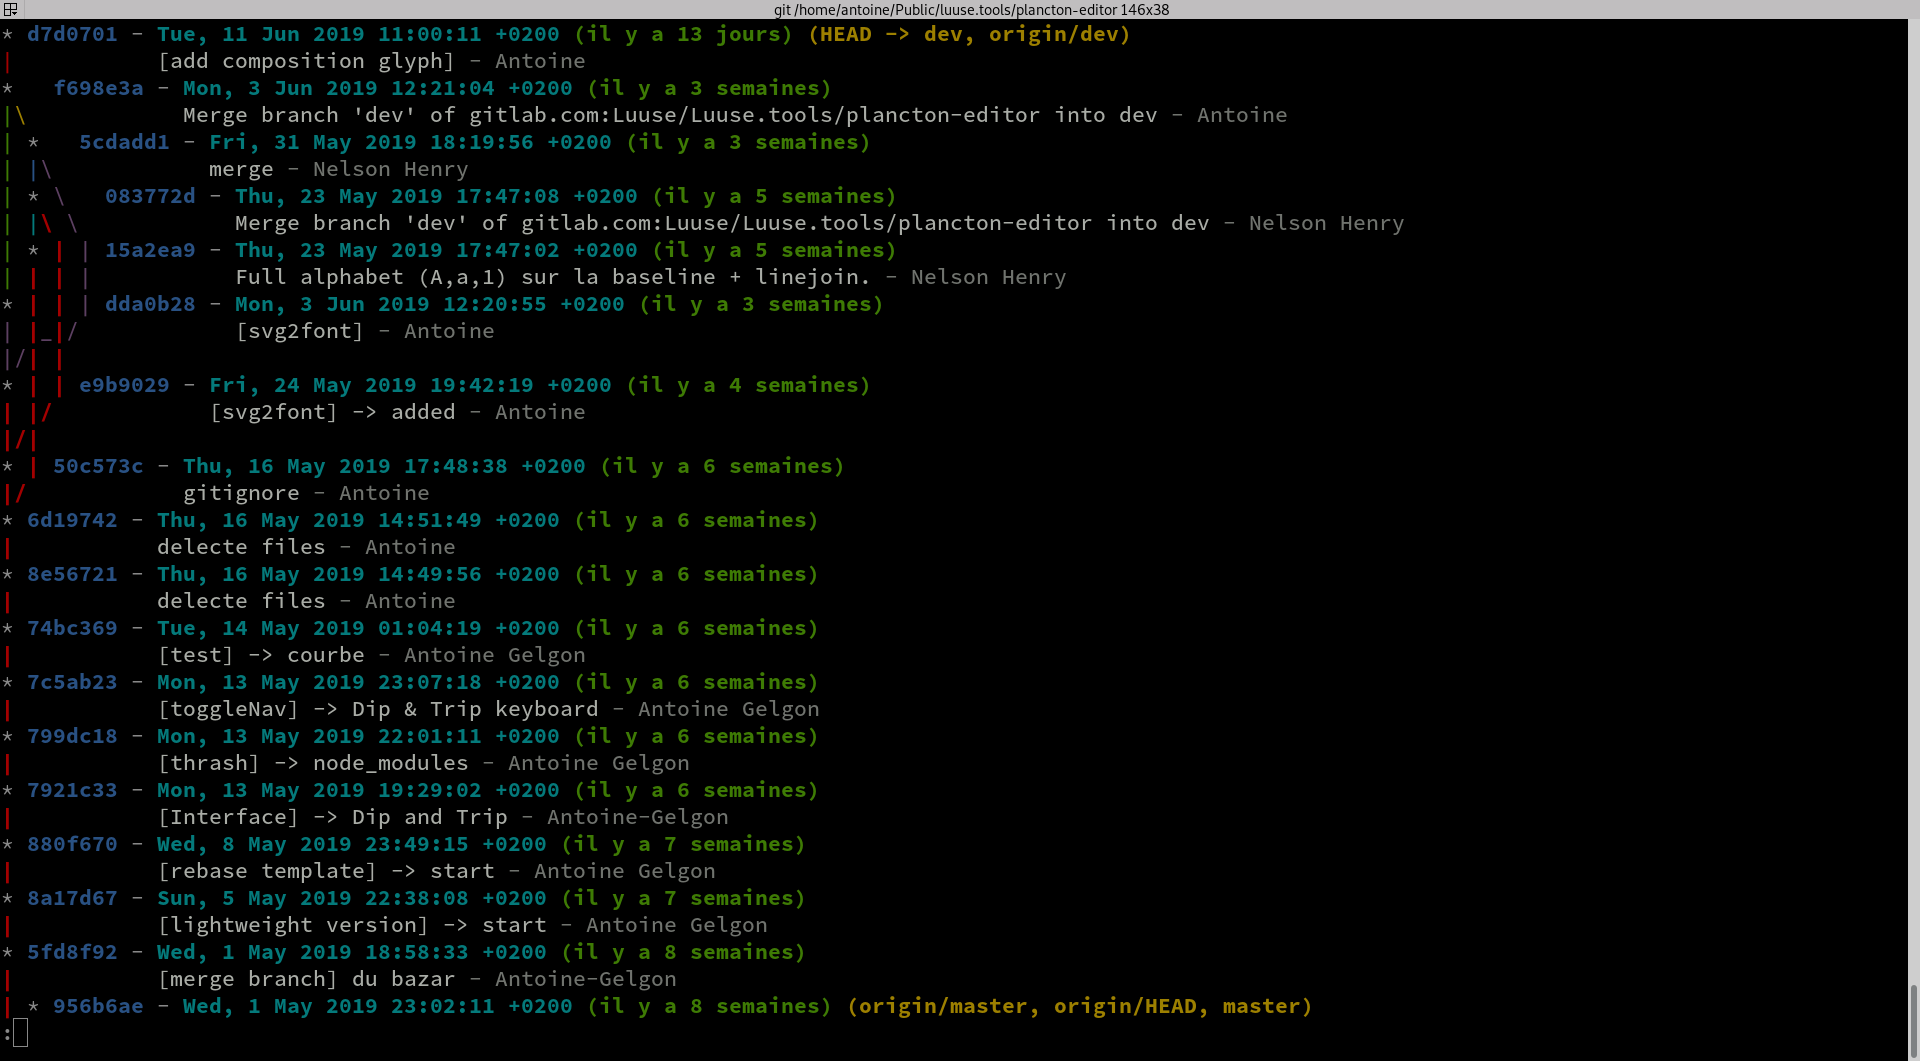 After you can build an alias.
 -
.gitignore Grav Project
.libsass.json
.DS_Store
*.min.css
*.css.map
accounts/*
plugins/*
*.png
*.PNG
*.jpg
*.JPG
*.jpeg
*.JPEG
*.GIF
*.gif
*.mp4
*.MP4
*.tiff
*.tif
*.TIFF
Imagmagick
-
Turn pngs into gifs
convert -delay 60 *.png -loop 0 live3.gif convert rose.jpg -resize 80% rose.png -
Pdf to png > all files in a directory
mogrify -density 300 -format png *.pdf -
72 dpi
convert -units PixelsPerInch input.png -density 72 output.png -
resize %
convert -resize 40% versions_44.png -
Blur img
convert -resize 10% -resize 1000% output_image.jpg blured.jpg -
Monochrome Tinted Image > replace black with color
convert in.jpeg -fuzz 30% -fill 'rgb(114, 98, 60)' -opaque black out.jpeg
Inotifywait
Inotifywait efficiently waits for changes to files using Linux's inotify interface. It is suitable for waiting for changes to files from shell scripts. It can either exit once an event occurs, or continually execute and output events as they occur.
-
Install
On Archlinux : sudo pacman -Ss inotify-tools.
With npm : npm install -g inotify.
-
Exemples
If you want make an event with recursives files. '.' is the root path.
#!/usr/bin/env bash

inotifywait -m -r '.' -e create -e moved_to |
while read path action file; do
  echo 'ACTION HERE!!';
done
Javascript
-
XMLHttpRequest
var xhr = new XMLHttpRequest()
xhr.open('GET', 'https://your.site')
xhr.send(null)

xhr.onreadystatechange = function () {
    var DONE = 4
    var OK = 200
    if (xhr.readyState === DONE) {
        if (xhr.status === OK) {
            console.log('yes')
        } else {
            console.log('Error: ' + xhr.status)
        }
    }
}
Linux
* / => Racine, elle contient les répertoires principaux
* /bin (binaries) => Exécutables essentiels au système, utilisables par tous les utilisateurs (ls pwd cp)
* /boot => fichiers permettant à Linux de démarrer
* /dev (device) => Fichiers spéciaux représentant les point d'entrées de tous les périphériques (fichiers spéciaux des disques dusr, écrans, partitions, consoles TTY, webcam)
* /etc (editing text config) => Contient les fichiers texte nécessaires à la configuration du système et des setvices (XXX.conf, passwd, inittab, fstab)
* /home => Répertoire personnel des utilisateurs
* /lib (librairies) => contient les bibliothèques partagées essentielles au système lors du démarrage (et modules noyau)
* /lib64 => idem /lib mais pour les 64bits (parfois, on trouvera lib et lib32. Dans ce cas, lib = 64bits et lib32 = 32bits)
* /mnt (mount) /media => Là où les ressources peuvent être montées de manière permanente (/media) ou temporaire (/mnt)
* /opt (optional) => Répertoire générique pour l'installation de programmes installés hors dépôts de la distribution.
* /proc (process) => Répertoire virtuel ne prenant aucune place sur le disque. Contient des informations sur le système (noyau, processus).
* /root => Répertoire personnel du super utilisateur (le répertoire de root n'est pas dans /home, car bien souvent le /home est sur une partition à part. En cas d'échec de montage de /home, root à quand même accès à son répertoire personnel).
* /run (runtime system) => Contient des informations relatives au système concernant les utilisateurs et les services en cours d'exécution.
* /sbin (super binaries) => Contient les programmes système essentiels utilisables par l'admin uniquement.
* /srv (services) => N'est pas présent dans toutes les distributions. C'est un répertoire de données pour divers services (stockage des documents de comptes FTP, ou pages de sites web)
* /sys => Répertoire virtuel ne prenant aucune place sur le disque. Contient des informations entre le système et ses composants matériels.
* /tmp (temporary) => Répertoire fichier temporaires
* /usr (Unix System Resources) => Contient des programmes installés (/usr/bin) avec leur librairies (/usr/lib ou /usr/lib64) tels que firefox, libreoffice, ... quelques programmes réservés à l'admin système (/usr/sbin) et les fichiers de code source (/usr/src). On y retrouve /usr/share avec les éléments partagés indépendants de l'architecture (documentation, icônes, ...). Dans /usr/local on pourra installer les programmes compilés manuellement sur le système.
* /var (variable) => contient les données variables (fichiers de log dans /var/log) mais parfois les bases de données (/var/lib/mysql) et les pages de site web (/var/www/html)
Php
-
Run php without apache
In your shell:
php -S localhost:8000if you want start at a different root:
php -S localhost:8000 -t </path/to/root> -
Slugify
public function slugify($string){ $string = str_replace(array('[\', \']'), '', $string); $string = preg_replace('/\[.*\]/U', '', $string); $string = preg_replace('/&(amp;)?#?[a-z0-9]+;/i', '-', $string); $string = htmlentities($string, ENT_COMPAT, 'utf-8'); $string = preg_replace('/&([a-z])(acute|uml|circ|grave|ring|cedil|slash|tilde|caron|lig|quot|rsquo);/i', '\\1', $string ); $string = preg_replace(array('/[^a-z0-9]/i', '/[-]+/') , '-', $string); return strtolower(trim($string, '-')); } -
Regex for type (french)
function rft($content) { $thinsp = '<span class="thinsp"> </span>'; $regex = array( # On commence par retirer tout les espaces avant de mettre les espaces fines "/(?![^<]*>)\s*;/" => ';', # espace point-virgule => point-virgule "/(?![^<]*>)«\s*/" => '«', # guillement français ouvrant espace => guillement français ouvrant "/(?![^<]*>)\s*»/" => '»', # espace guillement français fermant => guillement français fermant "/(?![^<]*>)\s*:/" => ':', # espace deux points => deux points "/(?![^<]*>)\s*!/" => '!', # espace point d'exclamation => point d'exclamation "/(?![^<]*>)\s*\?/" => '?', # espace point d'interrogation => point d'interrogation # On rajoute une balise .thinsp entourant une espace insécable. # La gestion de la largeur de l'espace se fait en css avec la propriété letter-spacing // "/(?![^<]*>);/" => '<span class="thinsp"> </span>;', # point virgule => narrow non breaking space point virgule "/(?![^<]*>):/" => '<span class="thinsp"> </span>:', # deux points => narrow non breaking space deux points "/(?![^<]*>)«/" => '«<span class="thinsp"> </span>', # guillement ouvrant => guillemet ouvrante narrow non breaking space "/(?![^<]*>)»/" => '<span class="thinsp"> </span>»', # guillement fermant => narrow non breaking space guillemet fermante "/(?![^<]*>)!/" => '<span class="thinsp"> </span>!', # point d'exclamation => narrow non breaking space point d'exclamation "/(?![^<]*>)\?/" => '<span class="thinsp"> </span>?', # point d'interrogation => narrow non breaking space guillemet fermante # Caractères spéciaux "/(?![^<]*>)& /" => '& ', # & => & "/(?![^<]*>)oe/" => 'œ', # oe => œ "/(?![^<]*>)ae/" => 'æ', # ae => æ "/(?![^<]*>)OE/" => 'Œ', # OE => Œ "/(?![^<]*>)AE/" => 'Æ', # AE => Æ "/(?![^<]*>)\.\.\./" => '…', # AE => Æ # Espace insécable après les mots de 1 et 2 lettre pour le drapeau "/ (\b\p{L}{1,2}\b) /u" => ' $1 ', # cherche tout les mots de 1 et 2 lettre, accentués compris "/ (\b[a-z]{1,2}\b) /i" => ' $1 ' # dans le cas où 2 mots de 1 ou 2 lettres se suivent }); foreach ($regex as $input => $output) { $content = preg_replace($input, $output, $content); } return $content; }Then use the css property
letter-spacingon.thinspto set the width value of your thinspace. -
Regex for type (english)
function rft($content) { $thinsp = '<span class="thinsp"> </span>'; $regex = array( "/ ;/" => ';', "/« /" => '«', "/“ /" => '“', "/ »/" => '»', "/ ”/" => '”', "/ :/" => ':', "/ !/" => '!', "/ €/" => '€', "/ $/" => '$', "/ £/" => '£', "/ \?/" => '?', "/«/" => '«' . $thinsp, "/»/" => $thinsp . '»', "/€/" => $thinsp . '€', "/$/" => $thinsp . '$', "/£/" => $thinsp . '£', "/& /" => '& ', "/oe/" => 'œ', "/ae/" => 'æ', "/OE/" => 'Œ', "/AE/" => 'Æ', "/\.\.\./"=> '…', # url bug correction '/http<span class="thinsp"> <\/span>:/' => 'http:', '/https<span class="thinsp"> <\/span>:/' => 'https:', '/href="<main></main>ilto<span class="thinsp"> <\/span>:/' => 'href="mailto:', '/watch<span class="thinsp"> <\/span>?/' => 'watch', }); foreach ($regex as $input => $output) { $content = preg_replace($input, $output, $content); } return $content; }Then use the css property
letter-spacingon.thinspto set the width value of your thinspace.
Processwire
-
DestinationPath is not writable
``` bash
cd /your/web/root/
chmod -R og+rw ./site/assets
```
Bash
-
PDF imposition for printing booklet
using pdfbook2
https://github.com/jenom/pdfbook2 requirements Python 3.6, pdfjam https://github.com/rrthomas/pdfjam, pdfcrop and their dependencies. --signature=8 (Define the signature for the booklet handed to pdfjam, needs to be multiple of 4 (default: 4)) --short-edge (opposite of long-edge, configuration dfor double-side printing)
pdfbook2 --paper=a4paper --no-crop --signature=8 --short-edge test.pdf
Rsync
-
Envoyer un fichier sur un server
$ rsync myfile.html user@exemple.com:/server/path/ -e 'ssh -p 444' -
Envoyer un dossier sur un server
$ rsync -r myfolder/ user@exemple.com:/server/path/ -e 'ssh -p 444' -
Récupérer un fchier sur un server
$ rsync user@exemple.com:/server/path/myfile.html /local/path/ -e 'ssh -p 444' -
Récupérer un dossier sur un server
$ rsync -r user@exemple.com:/server/path/myfolder/ /local/path/ -e 'ssh -p 444'
ssh
-
SCP : Transfert de fichiers entre machines
Du PC local vers un PC distant
$ scp chemin/local/fichier-envoi user@192.168.1.x:chemin/de/réception/Du PC Distant vers le PC local
$ scp user@192.168.1.x:chemin/distant1/fichier-envoi chemin/local/de/receptionDu PC distant vers un autre PC distant
$ scp user@192.168.1.x:chemin/distant1/fichier-envoi 192.168.1.x:chemin/distant2/de/receptionEn cas de port personnalisé...
$ scp -P 12345 chemin/origine/fichier user@192.168.1.x:chemin/de/réception
Twig
-
Access item at index in associative array
array|slice(index, 1)|first
Vim
-
Replace.
Simple replace
All in content
:%s/paul/luc/gRemove all balise xml/html
:%s/<[^>]*>//gIndent HTML in PHP file
To indent html in vim, select the lines then press
=But in php file, change the filetype before with:set filetype=html
youtube-dl
Download videos from youtube.com or other video platforms - github
-
Download playlist from youtube
youtube-dl --extract-audio --audio-format mp3 -o "%(title)s.%(ext)s" <url to playlist>